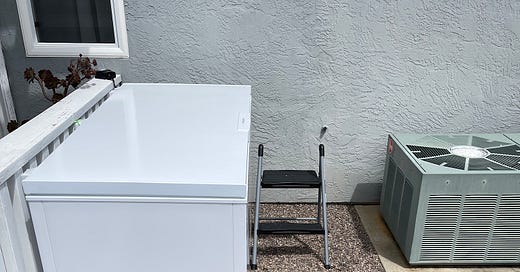
With benefits ranging from mental to physical, it’s no wonder deliberate cold exposure therapy has become mainstream. I was able to cobble together a freezer chest setup for under $1000 and here are all the resources I’ve compiled to help you do the same. Enjoy, safely!
Initial Considerations
Location Matters
First, plan ahead as to where outside is convenient to have the unit situated on your property. Remember when it’s full of 100 gallons of water, it can weigh more than 800 pounds.
You'll want a spot that is close to an outdoor spigot, so you can easily reach it with a hose when refilling and cleaning the unit.
Also consider drainage, run-off, and erosion. When you drain the unit every ~4 weeks or so, where are the 100 gallons of water going to go?
Safety Measures
- Be sure to lock when not in use, so no kids, animals or anyone can ever get access to it when you are not around. Most new units come with keys and a lock. Be responsible.
- Use a GFI outdoor outlet, so you can plug in the unit safely. Always unplug it before getting inside the water to prevent the potentiality of electrocution.
- Use a step stool to get in and out. I have a 2-step step stool that really helps with this. From a safety perspective, it’s a no-brainer.
Maintenance
Upkeep
Part of the responsibility of having this at home is maintaining it. To get the most out of each fill, be sure to rinse off your body before getting in. That helps remove any oils from lotions, deodorants, hair gel, etc. that can murk up the water prematurely.
Also, be mindful of your feet. Wear sandals so as to not attract extra grime and particles into the plunge. I keep a small fish tank strainer nearby to skim out those inevitable floaters.
Upon finishing your plunge, wipe down the seams with your towel and pour in a shot of peroxide for the homies.
Cleaning
When the water is a cloudy gray color about 4 weeks in, it’s time to clean your unit.
I use a 16-foot-long tube from ACE Hardwear to drain the water off and down the embankment near my setup. I just shove it into the drainage port once I unscrew the inner and outer plugs.
What to Buy
ESSENTIAL EQUIPMENT
Freezer Chest (this is the model I purchased and it was $580 at the time and now is $720!!) so look online for better deals, coupons, other options, used units, etc. but free delivery is always nice!
Frigidaire 14.8 cu. ft. Chest Freezer in White-FFFC15M4TW - The Home Depot
Chest on/off timer: https://www.amazon.com/gp/product/B0716LG6J6
This thing is key. Once you get the water to your desired temp, you can set this timer so the chest only turns on once a day for about an hour. That's all you will need to maintain the water temp. I usually would have mine go on from 1-2am. I’m sure a smart option is available with an app to go with it.
Thermometer: https://www.amazon.com/gp/product/B072N3L8ZM
A great way to know the temp of your water and much more accurate than the electronic laser guns or floating thermometers because the cooling elements are on the bottom of the unit so the deeper water will be colder than the top layer.
Epsom Salt: https://www.amazon.com/gp/product/B004N7DQHA
Helpful to cool the water and create an icy feel, but more so for your body, given the benefits of exposure to magnesium baths. I usually will use 5 pounds per refill of the chest.
Food Grade Hydrogen Peroxide: https://www.amazon.com/gp/product/B01AW1HYIC
I put a large splash of this in the bottom of the chest before filling it with water. It helps keep the bacteria down and extends the life of each round of water your put into the freezer chest. I also pour in a splash after every use. Typically I can get up to 4 weeks before needing to drain/clean/refill the chest. Rinsing off before will help, tremendously.
Garden Hose Filter: https://www.amazon.com/gp/product/B007I6MN72
Use this on the end of the hose to filter the water going into the chest. This is nice to have and not essential. Make sure to let the water run through for 30 seconds before aiming it into the plunge to rinse out or a charcoal color will cloud your plunge water.
Food Grade NSF RTV Silicone Sealant Adhesive White:
https://www.amazon.com/gp/product/B01F9HCISU
To ensure the longevity of your chest freezer, you need to seal up all the plastic seams so you don’t get water damage inside the unit. Remember, these unit weren’t designed at the factory to hold actual water, just food and ice. It’s best to do this right away and to do it well. This means applying a bead over all the seams, using your finger and a towel for a precision bead and let it dry thoroughly (~24hrs) before adding water to the unit.
Aquarium Fishing Net with Plastic Handle 8 Inch
https://www.amazon.com/Laojbaba-Aquarium-Fishing-Plastic-Handle/dp/B08T17FHZM
Your silicon sealant will slowly degrade and flake off into your water, plus other floaters, insects, and leaves will find their way into your water, inevitably. Having a little strainer net nearby can be super helpful to quickly remove these pesky particles.
Additional Resources
The most helpful videos I could find and which I used to help compile the equipment I ended up getting:
Brian Mackenzie's How to Guide:
Brad Kearns' How to Guide:
(One of the better guides out there. Funny too)
Helpful Articles:
Mark Sisson’s Comprehensive Guide:
https://www.marksdailyapple.com/definitive-guide-to-cold-therapy/
Ben Greenfield: How To Make Your Own Cold Tub Setup
Protocols
USING DELIBERATE COLD EXPOSURE FOR HEALTH AND PERFORMANCE:
https://hubermanlab.com/using-deliberate-cold-exposure-for-health-and-performance/
One of the main takeaways from this is to wait 4 hours post-workout to use the cold plunge so as to not interrupt the body’s natural response to recovering from the workout.


